
Knowledgebase: SmartCode VNC Manager > Computer Management Tools
|
Enable VNC access in Safe Mode
|
|
|
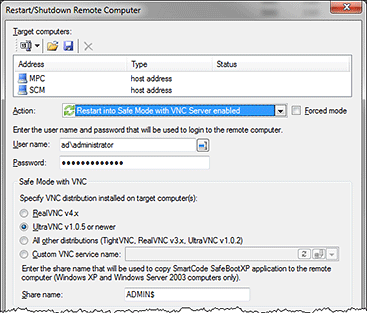
This article explains how to reboot a remote computer into Safe Mode with VNC access enabled. To reboot a remote computer into Safe Mode with VNC access
 To reboot a remote computer back into Normal mode
Eventually, after you have finished fixing problems with a computer, you would want to reboot it back into Normal mode. To do so you will either need to run bcdedit.exe /deletevalue safeboot command (use this command on Vista or newer OSes only) on each remote computer that needs to be reverted back to the Normal mode or use the Restart/Shutdown Remote Computer window. In the latter case, you should select Restart into Normal mode (cancel Safe Mode with VNC) item from the actions list. APPLIES TO: SmartCode VNC Manager (Enterprise Edition) v5.5.7.0 or newer. | |
|
|