In this article
Adding A Computer To The VNC Thumbnails ViewVNC Thumbnail View SettingsVNC Thumbnail Screenshots page
VNC Thumbnails View
The VNC Thumbnails View allows you to view the screens of multiple remote computers simultaneously. It also allows you to take screenshots of items added to the view.
Adding A Computer To The VNC Thumbnails View
To add a computer to the thumbnails view select one or more computers in the registered computers view, open the context menu and select the VNC Thumbnails View and then the Add To Default Tab (Ctrl+T shortcut) or the Add To New Tab (Ctrl+Shift+T shortcut).
To remove a computer from the thumbnails view, select one or more thumbnail images, open the context menu and select the Delete command (Del shortcut).
If you close the VNC Manager with the VNC Thumbnails view open, these thumbnails will be automatically restored the next time your run the VNC Manager.
VNC Thumbnails View Settings
To edit the VNC Thumbnails view settings select page or click on the Settings button at the top of the VNC Thumbnails view.
VNC Thumbnails Page
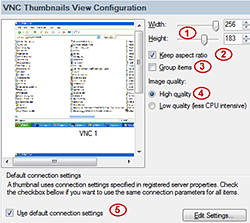
The numbered items apply to the numbers shown in the picture at right:
- Lets you select the Thumbnail item’s width and height. The maximum width and height supported is 256px.
- You should check the Keep aspect ratio to keep the image’s current aspect ratio, or uncheck the option to scale Width and Height independently.
- Check the "Group Items" to group the VNC Thumbnail items based on their parent folder.
- Allows you to specify the thumbnail image quality. The high quality setting produces smoother images but uses up to 10% more CPU resources compared to the "Low quality" setting.
- Check "Use default connection settings" option to use the same VNC connection settings for all items added to VNC Thumbnails view. If this setting is unchecked, the VNC Thumbnails view will use individual settings that must be specified in the item’s properties.
Thumbnail Display page
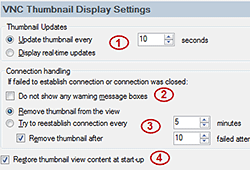
The numbered items apply to the numbers shown in the picture at right:
- Allows you to specify how often the VNC thumbnails items should be updated. You can select real-time update mode or refresh screen via a time interval. The later method allows you to decrease the CPU load.
- Checking this option prevents the computer from displaying warning messages if you lose the connection.
- Allows you to specify what should be done if connection to a remote VNC server fails. You can choose to remove the failed item’s thumbnail or try to re-establish the connection.
- Checking this option restores the thumbnails that were previously displayed when the VNC Manager instance was last closed.
VNC Thumbnail Screenshots page
The VNC Thumbnails view can take and store screenshots of items added to the view based on user defined time intervals. It’s possible to take screenshots of either all items added to the view or only specifically selected items.
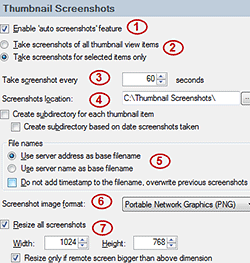
The numbered items apply to the numbers shown in the picture at right:
- Turns the "auto-screenshots" feature on or off.
- Allows you to specify whether screenshots of all items should be taken or only specifically selected items. To specify items select the item in the VNC Thumbnails view then open the context menu and select “Screenshots -> Enable screenshots for selected items” command. When the auto-screenshots feature is enabled, each thumbnail item configured for screenshots will display a small camera icon in the upper right corner of the thumbnail image.
- Allows you to specify how often the screenshots should be taken.
- Allows you to specify where to store the screenshots on your hard drive.
- Allows you to specify the file naming rules.
- Specifies the screenshot image file format.
- Allows you to specify the size of the stored screenshots so they occupy less disk space.
APPLIES TO: SmartCode VNC Manager v5.0.14.0 or newer
